When I work in a command line environment I want to define a color scheme once and let all other command line tools adopt that color scheme. To do so, I define a color scheme I like in my terminal emulator and trust that command line applications follow that theme. This approach often clashes with modern command line tools which have a custom-built way to handle color schemes. The idea is to give users to more than the 16 colors defined in your terminal emulator (256 colors or even true-color support), the downside is that you end up declaring color themes for a ton of command line applications if you care about consistency.
I care about consistency. I don’t care about true-color support. 16 colors are enough for me, thank you.
Since I’m using vim (or rather neovim) a lot, I tried to figure out how to get it to play nicely with my terminal color scheme. My goal is to generate a nice terminal color scheme using Root Loops, set it within my terminal emulator of choice, and then make vim stick to that color scheme without having to tweak my vim config.
Vim’s documentation, also available via :help syntax, helped me figure out how to do this. It wasn’t trivial (at least not for me, if you’ve built vim color schemes before this might be obvious).
I want to share what I learned and also share my ANSI-compliant 16-color vim color scheme with you.
Quick aside
For the sake of readability I’m going to write “vim” to mean both, vim and neovim from here on out. They both largely work the same when it comes to defining color schemes.
GUI and Terminal Modes
vim understands two different modes of operation: Terminal mode and GUI mode.
Terminal mode is intended for old-school terminals that only support 16 colors or less. GUI mode is used for terminals that support 256 colors (which is pretty much any terminal emulator these days) or even true-color, and for vim clients that don’t run in a terminal environment (gVim, for example). Vim tries to be smart about this and detects whether your terminal supports 256 colors or even a 24-bit color range (expressed in hexadecimal notation) based on a number of heuristics.
As a user, you can enforce terminal mode in vim and thus force it to use the 16 colors your terminal emulator declared by disabling the termguicolors option (either in your vimrc or init.lua or as a command in a running vim instance):
" Force vim to use 16 colors only
set notermguicolors
Defining a Color Scheme
In vim, you can define the look of syntax highlighting and editor elements using the highlight command. A vim color scheme is nothing else but a big series of highlight calls, defining which colors to use as the foreground and background colors for things like comments, strings, numbers, status bars, and many others. A full-blown highlight command takes several parameters:
highlight Comment ctermbg=0 ctermfg=8 guibg=#1a2137 guifg=#586899
"          (1)       (2)       (3)        (4)           (5)
The parameters to the highlight command are:
- The name of the “highlight group” you wish to modify. Could be something that shows up in syntax-highlighted code like
Comment,StringConditional,Boolean, or an editor element likeWinSeparator, orStatusLine. See:help highlight-defaultfor an overview. ctermbgdefines the background color to be used in terminal mode (which we enabled via `set notermguicolors). It takes a number from 0-255 where 0-15 map to the 16 ANSI color defined in your terminal emulator.ctermfgdefines the foreground color to be used in terminal mode.guibgdefines the background color to be used in GUI mode, in hexadecimal notation.guifgdefines the foreground color to be used in GUI mode.
An ANSI-Compliant Color Scheme
A lot of modern vim color schemes don’t bother being compliant with notermguicolors and terminal mode. They often don’t include ctermfg and ctermbg calls in their highlight calls and trust that everyone is running in 24-bit color mode.
This has led me to create my own ANSI-compliant vim color scheme that simply maps the 16 colors of my terminal emulator to various elements of vim’s syntax highlighting and editor UI.
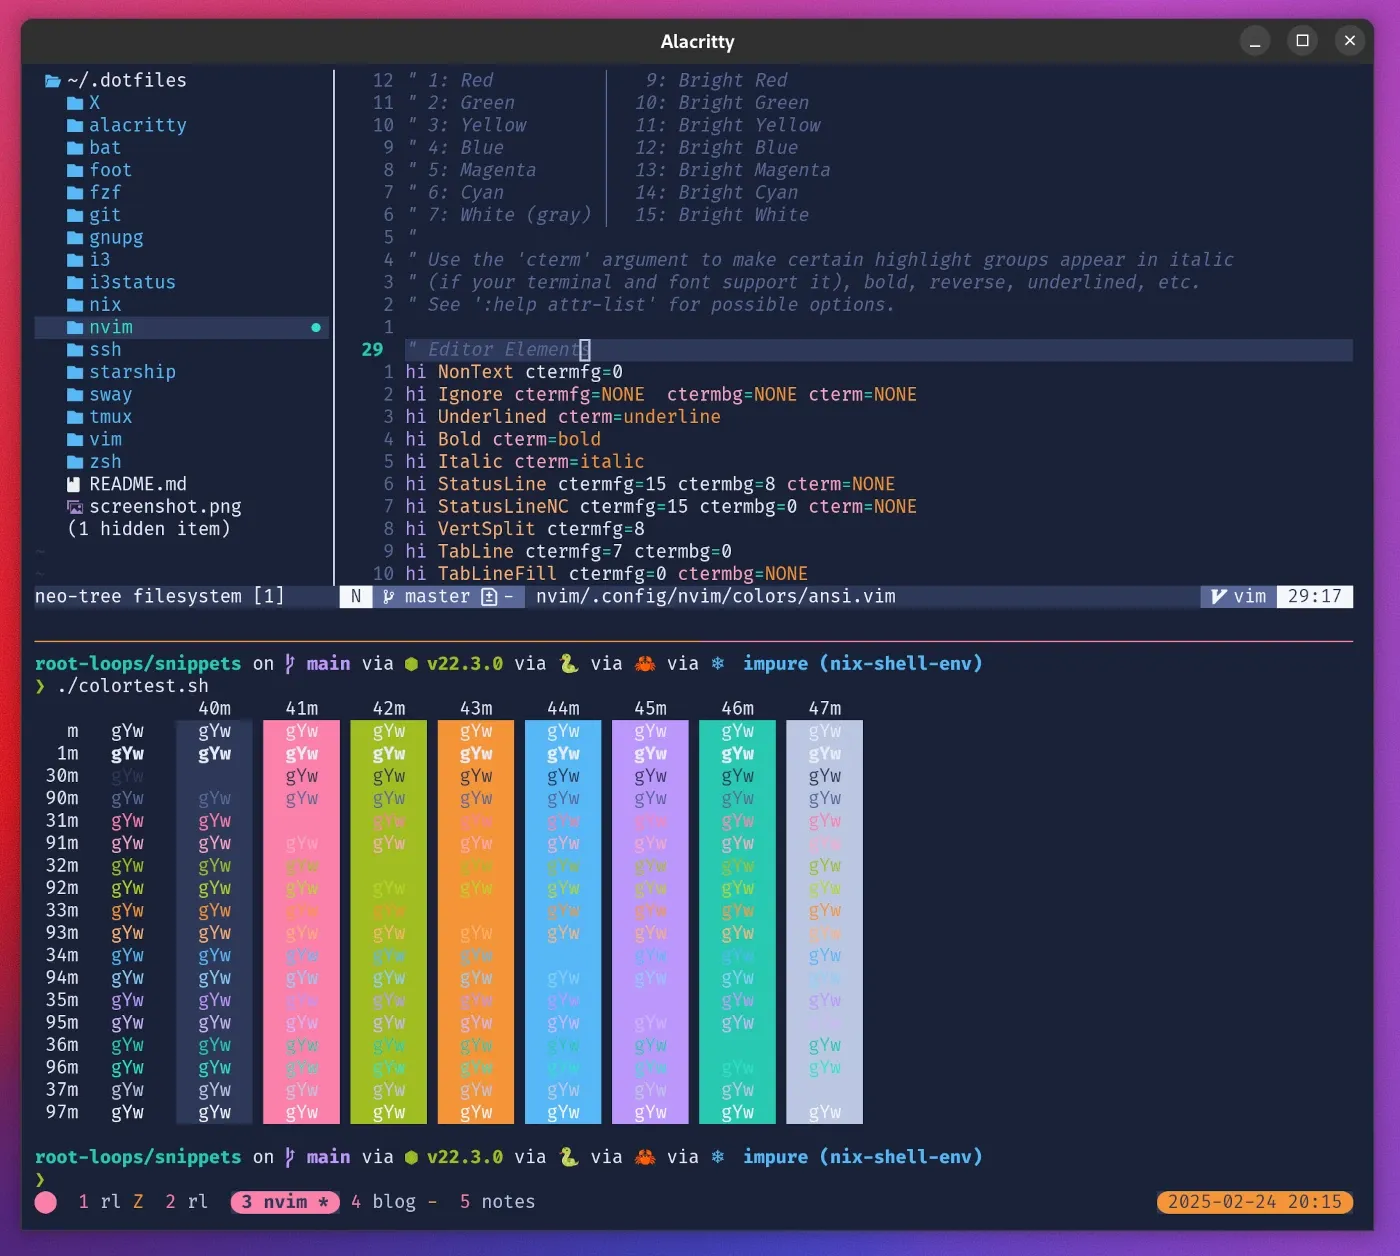
Here’s the color scheme in action. You can see vim at the top, a regular terminal session showing my terminal emulators standard color scheme at the bottom.
You can find the full scheme below. You can save it to ~/.vim/colors/ansi.vim and load it via colorscheme ansi in your vim configuration. I tried to comment it so that you can customize it as much as you like. Add new highlight groups, change colors, and have fun.
By the way, all the vim and neovim color schemes you can generate over at Root Loops work just fine in terminal mode, so you can also generate one over there instead of copying the one below. The benefit is that the Root Loops schemes work as an ANSI-compliant color scheme in terminal mode and use true-color in GUI mode.
set background=dark

hi clear

let g:colors_name = 'ansi'
set notermguicolors

" This color scheme relies on ANSI colors only. It automatically inherits
" the 16 colors of your terminal color scheme. You can change the colors of
" certain highlight groups by picking a different color from the following set
" of colors. If you sticked to the ANSI color palette conventions when setting
" colors in your terminal emulator, this will look pretty neat. If you used
" a terminal color scheme that uses a different convention (e.g. base16)
" colors will likely look very odd if you use this color scheme.
"
" 0: Black        │   8: Bright Black (dark gray)
" 1: Red          │   9: Bright Red
" 2: Green        │  10: Bright Green
" 3: Yellow       │  11: Bright Yellow
" 4: Blue         │  12: Bright Blue
" 5: Magenta      │  13: Bright Magenta
" 6: Cyan         │  14: Bright Cyan
" 7: White (gray) │  15: Bright White
"
" Use the 'cterm' argument to make certain highlight groups appear in italic
" (if your terminal and font support it), bold, reverse, underlined, etc.
" See ':help attr-list' for possible options.

" Editor Elements
hi NonText ctermfg=0
hi Ignore ctermfg=NONE  ctermbg=NONE cterm=NONE
hi Underlined cterm=underline
hi Bold cterm=bold
hi Italic cterm=italic
hi StatusLine ctermfg=15 ctermbg=8 cterm=NONE
hi StatusLineNC ctermfg=15 ctermbg=0 cterm=NONE
hi VertSplit ctermfg=8
hi TabLine ctermfg=7 ctermbg=0
hi TabLineFill ctermfg=0 ctermbg=NONE
hi TabLineSel ctermfg=0 ctermbg=11
hi Title ctermfg=4 cterm=bold
hi CursorLine ctermbg=0 ctermfg=NONE
hi Cursor ctermbg=15 ctermfg=0
hi CursorColumn ctermbg=0
hi LineNr ctermfg=8
hi CursorLineNr ctermfg=6
hi helpLeadBlank ctermbg=NONE ctermfg=NONE
hi helpNormal ctermbg=NONE ctermfg=NONE
hi Visual ctermbg=8 ctermfg=15 cterm=bold
hi VisualNOS ctermbg=8 ctermfg=15 cterm=bold
hi Pmenu ctermbg=0 ctermfg=15
hi PmenuSbar ctermbg=8 ctermfg=7
hi PmenuSel ctermbg=8 ctermfg=15 cterm=bold
hi PmenuThumb ctermbg=7 ctermfg=NONE
hi FoldColumn ctermfg=7
hi Folded ctermfg=12
hi WildMenu ctermbg=0 ctermfg=15 cterm=NONE
hi SpecialKey ctermfg=0
hi IncSearch ctermbg=1 ctermfg=0
hi CurSearch ctermbg=3 ctermfg=0
hi Search ctermbg=11 ctermfg=0
hi Directory ctermfg=4
hi MatchParen ctermbg=0 ctermfg=3 cterm=underline
hi SpellBad cterm=undercurl
hi SpellCap cterm=undercurl
hi SpellLocal cterm=undercurl
hi SpellRare cterm=undercurl
hi ColorColumn ctermbg=8
hi SignColumn ctermfg=7
hi ModeMsg ctermbg=15 ctermfg=0 cterm=bold
hi MoreMsg ctermfg=4
hi Question ctermfg=4
hi QuickFixLine ctermbg=0 ctermfg=14
hi Conceal ctermfg=8
hi ToolbarLine ctermbg=0 ctermfg=15
hi ToolbarButton ctermbg=8 ctermfg=15
hi debugPC ctermfg=7
hi debugBreakpoint ctermfg=8
hi ErrorMsg ctermfg=1 cterm=bold,italic
hi WarningMsg ctermfg=11
hi DiffAdd ctermbg=10 ctermfg=0
hi DiffChange ctermbg=12 ctermfg=0
hi DiffDelete ctermbg=9 ctermfg=0
hi DiffText ctermbg=14 ctermfg=0
hi diffAdded ctermfg=10
hi diffRemoved ctermfg=9
hi diffChanged ctermfg=12
hi diffOldFile ctermfg=11
hi diffNewFile ctermfg=13
hi diffFile ctermfg=12
hi diffLine ctermfg=7
hi diffIndexLine ctermfg=14
hi healthError ctermfg=1
hi healthSuccess ctermfg=2
hi healthWarning ctermfg=3

" Syntax
hi Comment ctermfg=8 cterm=italic
hi Constant ctermfg=3
hi Error ctermfg=1
hi Identifier ctermfg=9
hi Function ctermfg=4
hi Special ctermfg=13
hi Statement ctermfg=5
hi String ctermfg=2
hi Operator ctermfg=6
hi Boolean ctermfg=3
hi Label ctermfg=14
hi Keyword ctermfg=5
hi Exception ctermfg=5
hi Conditional ctermfg=5
hi PreProc ctermfg=13
hi Include ctermfg=5
hi Macro ctermfg=5
hi StorageClass ctermfg=11
hi Structure ctermfg=11
hi Todo ctermfg=0 ctermbg=9 cterm=bold
hi Type ctermfg=11

" neovim-specific (remove if you're using vim)
hi NormalFloat ctermbg=0 ctermfg=15
hi FloatBorder ctermbg=0 ctermfg=7
hi FloatShadow ctermbg=0 ctermfg=15
Treesitter Support
Since version 0.5, neovim supports tree-sitter. In my own layman’s words, tree-sitter reads your code into a syntax tree which allows you to do advanced code navigation, editing, and syntax highlighting. For theming purposes in neovim, treesitter-support gives you more fine-grained control over styling certain code elements. You can, for example, define that the angle brackets, tag name, and attributes in an HTML tag (e.g. <span class="highlight">) should all be colored differently — which is not possible with vim’s default highlight groups.
If you want to use tree-sitter based syntax highlighting (again, you need neovim for this), you can add the following snippet to the end of your color theme file:
" Treesitter highlighting
" - allows for more precise syntax highlighting
" - only available for nvim >0.5
" - see also :help treesitter-highlight-groups

hi @variable ctermfg=15
hi @variable.builtin ctermfg=1
hi @variable.parameter ctermfg=1
hi @variable.member ctermfg=1
hi @constant.builtin ctermfg=5
hi @string.regexp ctermfg=1
hi @string.escape ctermfg=6
hi @string.special.url ctermfg=4 cterm=underline
hi @string.special.symbol ctermfg=13
hi @type.builtin ctermfg=3
hi @property ctermfg=1
hi @function.builtin ctermfg=5
hi @constructor ctermfg=11
hi @keyword.coroutine ctermfg=1
hi @keyword.function ctermfg=5
hi @keyword.return ctermfg=5
hi @keyword.export ctermfg=14
hi @punctuation.bracket ctermfg=15
hi @comment.error ctermbg=9 ctermfg=0
hi @comment.warning ctermbg=11 ctermfg=0
hi @comment.todo ctermbg=12 ctermfg=0
hi @comment.note ctermbg=14 ctermfg=0
hi @markup ctermfg=15
hi @markup.strong ctermfg=15 cterm=bold
hi @markup.italic ctermfg=15 cterm=italic
hi @markup.strikethrough ctermfg=15 cterm=strikethrough
hi @markup.heading ctermfg=4 cterm=bold
hi @markup.quote ctermfg=6
hi @markup.math ctermfg=4
hi @markup.link.url ctermfg=5 cterm=underline
hi @markup.raw ctermfg=14
hi @markup.list.checked ctermfg=2
hi @markup.list.unchecked ctermfg=7
hi @tag ctermfg=5
hi @tag.builtin ctermfg=6
hi @tag.attribute ctermfg=4
hi @tag.delimiter ctermfg=15

hi link @variable.parameter.builtin @variable.parameter
hi link @constant Constant
hi link @constant.macro Macro
hi link @module Structure
hi link @module.builtin Special
hi link @label Label
hi link @string String
hi link @string.special Special
hi link @character Character
hi link @character.special SpecialChar
hi link @boolean Boolean
hi link @number Number
hi link @number.float Float
hi link @type Type
hi link @type.definition Type
hi link @attribute Constant
hi link @attribute.builtin Constant
hi link @function Function
hi link @function.call Function
hi link @function.method Function
hi link @function.method.call Function
hi link @operator Operator
hi link @keyword Keyword
hi link @keyword.operator Operator
hi link @keyword.import Include
hi link @keyword.type Keyword
hi link @keyword.modifier Keyword
hi link @keyword.repeat Repeat
hi link @keyword.debug Exception
hi link @keyword.exception Exception
hi link @keyword.conditional Conditional
hi link @keyword.conditional.ternary Operator
hi link @keyword.directive PreProc
hi link @keyword.directive.define Define
hi link @punctuation.delimiter Delimiter
hi link @punctuation.special Special
hi link @comment Comment
hi link @comment.documentation Comment
hi link @markup.underline underline
hi link @markup.link Tag
hi link @markup.link.label Label
hi link @markup.list Special
hi link @diff.plus diffAdded
hi link @diff.minus diffRemoved
hi link @diff.delta diffChanged
Further Reading
If you want to learn more about the weird world of vim’s syntax highlighting, color schemes, terminal colors and highlight groups, I recommend you check out the following help pages:
:help termguicolors:help highlight:help highlight-default:help syntax:help treesitter-highlight-groups(for neovim’s tree-sitter support)